DemoPad Centro CM - IP Network API Reference Manual

Table of Contents
Revision 1.0 - 13th November 2023
IPv4 Address
When using factory default settings, the Centro CM presents itself as a DHCP Client. Thus, it will be allocated an IPv4 IP address from a local DHCP server.
If you cannot establish the IP address of the Centro CM, see Troubleshooting
Connection Details
The Centro CM presents a TCP Server in order to establish a connection with a TCP socket client application. Ref RFC793.
Data is sent raw (uncooked) and is therefore plaintext. Further application abstraction, such as using a Telnet application is not required. The use of Telnet for the RS-232 / RS485 / RS-422 bridge port is strongly discouraged.
No more than 8 concurrent TCP socket clients can be supported simultaneously on each Centro CM TCP port. Attempting to add more than 4 concurrent connections will result in the 9th attempt being rejected.
By default, TCP sockets are closed by the Centro CM after 2 minutes. This can be altered using the Communication Protocol.
TCP client applications can use either persistent or 'one-shot' connection methods.
The Centro CM listens on 2 discrete TCP socket ports. Connection to a specific port is dependant on the desired function.
TCP Port List:
- 7500: Communication Protocol
- 7501: RS-232 / RS-422 / RS-485 Port bridge
Data sent / received via TCP port 7501 are a direct representation of all data sent / received via the related RS-232 / RS-485 / RS-422 port. Data is sent / received “as-is”. Communication on this port is simply a bridge. There is no processing on this port. The Centro CM Communication Protocol does not apply.
All data bytes from 0x00 through to 0xFF are supported.
Data sent / received via TCP port 7500 conforms to the Centro CM communication protocol listed below.
Communication Protocol
Protocol examples will represent data using the ASCII printable character set.
All commands sent from a TCP socket client are to be terminated with a <Carriage Return> character byte. Depending on your TCP socket client application, this may be represented by:
0x0D(Hex)\r(Escape notation)$0D(Hercules)\x0D(Escape byte notation)
Example:
$RELAYSTATUS 1\x0D
All responses sent from the Centro CM are terminated with <Carriage Return><Line Feed> character bytes. Depending on your TCP socket client application, this may be represented by:
0x0D 0x0A(Hex)\r\n(Escape notation){0D}{0A}(Hercules)\x0D \x0A(Escape byte notation)
Example:
RELAY 01 OPEN\x0D\x0A
Upon establishing a connection with a TCP socket client, the Centro CM will send the welcome message:
Centro-C Firmware Version : V1.7.5\x0D\x0A
N.B. The firmware version shown may differ - see $VERSION
Command List
The command list syntax and examples will represent data using the ASCII printable character set.
Command syntax will use value substitution bounded by the “<” and “>” symbols.
Each line of data in syntax and examples are delimited by the termination symbols, see Communication Protocol.
$VERSION - Return system firmware version
Use this command to return the current Centro CM system firmware version
Command syntax:
$VERSION
Command example:
$VERSION
Return syntax:
Centro-CM Firmware Version : V<vmaj>.<vmin>
Where:
- <vmaj> = 0-9
- <vmin> = 00-99
Return example:
Centro-CM Firmware Version : V2.15
$RC - Set a relay to a closed state
Use this command to close a specific relay.
Command syntax:
$RC <relay_number>
Where:
-
<relay_number> = 1-4
The number of the relay with reference to the product chassis labelling
Command example:
Close relay 3
$RC 3
Return syntax:
RELAY <relay_number> CLOSED
Where:
- <relay_number> = 00-04
Return example:
RELAY 03 CLOSED
$RO - Set a relay to an open state
Use this command to open a specific relay.
Command syntax:
$RO <relay_number>
Where:
-
<relay_number> = 1-12
The number of the relay with reference to the product chassis labelling
Command example:
Open relay 3
$RO 3
Return syntax:
RELAY <relay_num> OPEN
Where:
- <relay_num> = 00-04
Return example
RELAY 03 OPEN
$RELAYSTATUS - Return the current state of a relay
Use this command to return the current state of a specific relay.
Command syntax:
$RELAYSTATUS <relay_number>
Where:
-
<relay_number> = 1-4 or ?
The number of the relay with reference to the product chassis labelling. Use ? to return the status of all relays
Command example 1:
Return the state of relay 3
$RELAYSTATUS 3
Command example 2:
Return the state of all relays
$RELAYSTATUS ?
Return syntax:
RELAY <relay_num> <relay_state>
Where:
- <relay_num> = 00-04
- <relay_state> = OPEN or CLOSED
or
RELAYSTATUS <r1><r2><r3><r4>
Where:
-
<r1> = O or C
The state of relay 1, OPEN or CLOSED
-
<r2> = O or C
The state of relay 2, OPEN or CLOSED
...
-
<r4> = O or C
The state of relay 4, OPEN or CLOSED
Return example 1 (Command example 1, if the current state of relay 3 is OPEN):
RELAY 03 OPEN
Return example 2 (Command example 2, if the current state of relays is OPEN, CLOSE, OPEN, OPEN):
RELAYSTATUS OCOO
$TRIGGER - Return the current state of all binary input ports
Use this command to return the current state of all binary input ports.
Command syntax:
$TRIGGER
Command example:
$TRIGGER
Return syntax:
INPUTSTATUS <b1><b2><b3><b4><b5><b6><b7><b8>
Where:
-
<b1> = 0-1
The state of input 1 with reference to the product chassis labelling
-
<b2> = 0-1
The state of input 2 with reference to the product chassis labelling
...
-
<b8> = 0-1
The state of input 8 with reference to the product chassis labelling
A closed circuit to the 5V terminal represents a 1 state. An open circuit represents a 0 state.
Return example (closed circuit on each even input number, open circuit on odd inputs):
INPUTSTATUS 01010101
$TRIGGERRELAYS - Set up automatic relay states based on a binary input change
Use this command to set up an automatic state allocation for all product relays based on a state change of a binary input port.
Command syntax:
$TRIGGERRELAYS <input_number> <input_state> <r1><r2><r3><r4>
Where:
-
<input_number> = 1-8
The number of the binary input port with reference to the product chassis labelling
-
<input_state> = OPEN or CLOSE
The binary state transition
OPEN = Input port transitions from closed to open state
CLOSE = Input port transitions from open to closed state
-
<r1> = 0 or 1 or T or -
The desired state of relay 1 with reference to the product chassis labelling
0 = Relay open
1 = Relay closed
T = Relay toggle
- = Relay unaffected
...
-
<r4> = 0 or 1 or T or -
The desired state of relay 4 with reference to the product chassis labelling
A closed circuit to the 5V terminal represents a CLOSE state. An open circuit represents an OPEN state.
Command example:
When input 5 transitions from closed to open state, open relay 1, close relay 2, toggle relay 3 and leave all other relays unaffected
$TRIGGERRELAYS 5 OPEN 01T-
Return syntax:
TRIGGERRELAYS <input_number> <input_state> <r1><r2><r3><r4>
Return example (using command example)
TRIGGERRELAYS 5 OPEN 01T-
$IREMIT - Emit an IR code from an IR output
Use this command to emit an IR code from a specific IR output port
Command syntax:
$IREMIT <port> <freq>,1,1,<p1on><p1off><p2on><p2off><...><pNon><pNoff>
Where:
-
<port> = 1-12
The number of the IR output port with reference to the product chassis labelling
-
<freq> = 4E20 - EA60
The hexadecimal value of the modulation or carrier frequency in Hz
-
<p1on> = 01 - FFFF
The hexadecimal count value of modulation periods for burst pair 1 on state
-
<p1off> = 01 - FFFF
The hexadecimal count value of modulation periods for burst pair 1 off state
-
<p2on> = 01 - FFFF
The hexadecimal count value of modulation periods for burst pair 2 on state
-
<p2off> = 01 - FFFF
The hexadecimal count value of modulation periods for burst pair 2 off state
...
-
<pNon> = 01 - FFFF
The hexadecimal count value of modulation periods for the last burst pair on state
-
<pNoff> = 01 - FFFF
The hexadecimal count value of modulation periods for the last burst pair off state
The on count is the number of periods of (1/modulation_frequency) that equals the burst pair on period.
The off count is the number of periods of (1/modulation_frequency) that equals the burst pair off period.
Relationship with Pronto CCF HEX format IR codes
Example HEX code:
0000 0067 0000 0015 0060 0018 0018 0018 0030 0018 0030 0018 0030 0018 0018 0018 0030 0018 0018 0018 0018 0018 0030 0018 0018 0018 0030 0018 0030 0018 0030 0018 0018 0018 0018 0018 0030 0018 0018 0018
                                    0018 0018 0030 0018 0018 03f6
First word: 0000 - Not used
Second word: 0067 - This is a Pronto CCF format hexadecimal value, that can be represented in decimal (𝑥) representing the modulation frequency (ƒ), where
𝑥 = 1000000 / (ƒ * 0.241246)
The modulation frequency value (ƒ) is used directly for <freq>, so for this example we can rearrange so that
ƒ = 1000000 / (𝑥 * 0.241246)
ƒ = 1000000 / (103 * 0.241246)
ƒ = 40244Hz
and represent as a hexadecimal value, rounded to the nearest integer
<freq> = 9D34
Third word: 0000 - Not used
Fourth word: 0015 - Not used
The remaining words are the hexadecimal burst pair values and can be substituted as a direct sequence to the $IREMIT command after removing any leading zeros.
Command example 1:
Send Pronto CCF HEX format IR code from IR output port 2
0000 0067 0000 0015 0060 0018 0018 0018 0030 0018 0030 0018 0030 0018 0018 0018 0030 0018 0018 0018 0018 0018 0030 0018 0018 0018 0030 0018 0030 0018 0030 0018 0018 0018 0018 0018 0030 0018 0018 0018
                                    0018 0018 0030 0018 0018 03f6
$IREMIT 2 9D34,1,1,60,18,18,18,30,18,30,18,30,18,18,18,30,18,18,18,18,18,30,18,18,18,30,18,30,18,30,18,18,18,18,18,30,18,18,18,18,18,30,18,18,3F6
Relationship with Global Cache format IR codes
Example GC code:
sendir,1:1,1,38000,1,1,341,168,22,19,22,62,22,62,22,62,22,62,22,62,22,62,22,19,22,62,22,19,22,19,22,19,22,19,22,19,22,19,22,62,22,19,22,62,22,62,22,62,22,62,22,62,22,62,22,19,22,62,22,19,22,19,22,19,22,19,22,19,22,19,22,62,22,760
sendir,1:1,1, - Not used
38000, - This is the modulation frequency in Hz. This value can be used directly for <freq> when represented as hexadecimal
1,1, - Not used
The remaining comma-separated values are the decimal burst pair values and can be substituted as a direct sequence to the $IREMIT command when represented as hexadecimal
Command example 2:
Send GC format IR code from IR output port 5
sendir,1:1,1,38000,1,1,341,168,22,19,22,62,22,62,22,62,22,62,22,62,22,62,22,19,22,62,22,19,22,19,22,19,22,19,22,19,22,19,22,62,22,19,22,62,22,62,22,62,22,62,22,62,22,62,22,19,22,62,22,19,22,19,22,19,22,19,22,19,22,19,22,62,22,760
$IREMIT 5 9470,1,1,155,A8,16,13,16,3E,16,3E,16,3E,16,3E,16,3E,16,3E,16,13,16,3E,16,13,16,13,16,13,16,13,16,13,16,13,16,3E,16,13,16,3E,16,3E,16,3E,16,3E,16,3E,16,3E,16,13,16,3E,16,13,16,13,16,13,16,13,16,13,16,13,16,3E,16,2F8
Return syntax:
IR OK
Return example:
IR OK
$REPEATIR - Repeat the last Infrared code a number of times
Use this command to repeat the last IR code a specific amount of times. The last IR code is the code sent with the last $IREMIT command.
Command syntax:
$REPEATIR <repeat>
Where:
-
<repeat> = 1-255
The number of times to emit the last IR code
Command example:
$REPEATIR 20
Return syntax:
IR OK
or
NO IR DATA
If there has been no IR sent previously, there will be no data to repeat. See $IREMIT
Return example:
IR OK
$STOPIR - Force the IR that is currently being emitted to stop.
Use this command to immediately stop any IR being emitted.
Command syntax:
$STOPIR
Command example:
$STOPIR
There is no return using this command.
$IRLEARN - Learn a single IR code received by the IR input port
Use this command to learn a single IR code from a 3rd-party IR remote. The output is formatted to the Centro IR format, see $IREMIT
The time window for learning a code is set at 5 seconds.
Command syntax:
$IRLEARN
Command example:
$IRLEARN
Return syntax:
Push Remote Control Button In 5 sec...
At this point, use the 3rd-party IR remote to generate the desired infrared code to be learned.
Followed by:
<freq>,1,1,<p1on><p1off><p2on><p2off><...><pNon><pNoff>
Where:
-
<freq> = 4E20 - EA60
The hexadecimal value of the modulation or carrier frequency in Hz
-
<p1on> = 01 - FFFF
The hexadecimal count value of modulation periods for burst pair 1 on state
-
<p1off> = 01 - FFFF
The hexadecimal count value of modulation periods for burst pair 1 off state
-
<p2on> = 01 - FFFF
The hexadecimal count value of modulation periods for burst pair 2 on state
-
<p2off> = 01 - FFFF
The hexadecimal count value of modulation periods for burst pair 2 off state
...
-
<pNon> = 01 - FFFF
The hexadecimal count value of modulation periods for the last burst pair on state
-
<pNoff> = 01 - FFFF
The hexadecimal count value of modulation periods for the last burst pair off state
The on count is the number of periods of (1/modulation_frequency) that equals the burst pair on period.
The off count is the number of periods of (1/modulation_frequency) that equals the burst pair off period.
For more information on the data returned, see $IREMIT
If no IR code is received, the command will timeout. No return will be sent.
Return example:
Push Remote Control Button In 5 Sec...
9a35,1,1,5f,18,2f,18,18,18,2f,18,18,18,18,18,18,18,18,18,2f,18,18,18,18,18,18,18,18,403,5f,18,2f,18,18,18,2f,18,18,18,18,18,18,18,18,18,2f,18,18,18,18,18,18,18,18,403,5f,18,2f,18,18,18,2f,18,18,18,18,18,18,18,18,18,2f,18,18,18,18,18,18,18,18,403,5f,18,2f,18,18,18,2f,18,18,18,18,18,18,18,18,18,2f,18,18,18,18,18,18,18,18,403,5f,18,2f,18,18,18,2f,18,18,18,18,18,18,18,18,18,2f,18,18,18,18,18,18,18,18,403,5f,18,2f,18,18,18,2f,18,18,18,18,18,18,18,18,18,2f,18,18,18,18,18,18,18,18,403,5f,18,2f,18,18,18,2f,18,18,18,18,18,18,18,18,18,2f,18,18,18,18,18,18,18,18,403,5f,18,2f,18,18,18,2f,18,18,18,18,18,18,18,18,18,2f,18,18,18,18,18,18,18,18,61e
$COMSTATUS 1 - Return the UART parameters for the RS-232 / RS-422 / RS-485 port
Use this command to return the UART parameters set for a specific RS-232 / RS-422 / RS-485 port
Command syntax:
$COMSTATUS 1
Command example:
$COMSTATUS 1
Return syntax:
COM 1 IS SET TO : <baud>,<byte>,<parity>,<stop>
Where:
-
<baud> = 1200, 2400, 4800, 9600, 19200, 38400, 57600 or 115200
The baud rate of the UART
-
<byte> = 8 or 9
The number of bits used in the data byte
-
<parity> = N, E or O
The use of the parity bit. None, Even or Odd
-
<stop> = 1-2
The number of stop bits
Note that on the Centro CM, the size of the data byte is fixed at 8 bits.
Return example:
COM 1 IS SET TO : 115200,8,N,1
$COM_SET 1 - Set the UART parameters for the RS-232 / RS-422 / RS-485 port
Use this command to set the UART parameters for the RS-232 / RS-422 / RS-485 port
Command syntax:
$COM_SET 1 <baud>,<byte>,<parity><stop>
Where:
-
<baud> = 1200, 2400, 4800, 9600, 19200, 38400, 57600 or 115200
The baud rate of the UART
-
<byte> = 8 or 9
The number of bits used in the data byte
-
<parity> = N, E or O
The use of the parity bit. None, Even or Odd
-
<stop> = 1-2
The number of stop bits
Command example:
Set the UART parameters for RS-232 port 4
$COM_SET 1 19200,8,N,1
Return syntax:
SET COM 1 <baud>,<byte>,<parity>,<stop>
Return example:
SET COM 1 19200,8,N,1
$COM_MODE 1 - Set the line signal mode for the RS-232 / RS-422 / RS-485 port
Use this command to set the line signalling mode parameter for the RS-232 / RS-422 / RS-485 port. The options on the Centro CM are 3-wire RS-232, full-duplex RS-422 or half-duplex RS-485.
Command syntax:
$COM_MODE 1 <sig>
Where:
-
<sig> =
RS232,RS422orRS485The line signalling mode
Command example:
$COM_MODE 1 RS422
Return syntax:
COM 1 IS SET TO <sig> MODE
Return example:
COM 1 IS SET TO RS422 MODE
$SETIP - Set static values for IP address, netmask and gateway IP address
Use this command to set static values for host IP address, netmask and gateway IP address. This will disable the DHCP client service.
If you are not careful, this is an easy way to lose communication with the Centro CM product. If you encounter a problem after using this command, see Troubleshooting
Command syntax:
$SETIP <host_ip> <netmask> <gateway_ip>
Where:
-
<host_ip> = IP Address
The host IP address in dotted octet format, .e.g. 192.168.2.1
-
<netmask>
The netmask in dotted octet format, .e.g. 255.255.255.0
-
<gateway_ip> = IP Address
The gateway IP address in dotted octet format, .e.g. 192.168.2.254
Command example:
$SETIP 192.168.10.106 255.255.255.0 192.168.10.254
There is no return using this command. The new setting will be set after a few seconds. Note, you will need to establish a new TCP socket connection.
$ETH_MODE 1 - Enable the DHCP client service for the network interface
Use this command to set the ethernet interface to use the DHCP client service. This will allow the Centro CM to obtain the host IP, netmask and gateway IP from the local DHCP server.
This will replace any statically assigned host IP, netmask and gateway IP values.
If you are not careful, this is an easy way to lose communication with the Centro CM product. If you encounter a problem after using this command, see Troubleshooting
Command syntax:
$ETH_MODE 1
Command example:
$ETH_MODE 1
There is no return using this command. The new setting will be set after a few seconds. Note, you will need to establish a new TCP socket connection.
$IPCONFIG - Return the current network interface details
Use this command to return the current Ethernet interface details
Command syntax:
$IPCONFIG
Command example:
$IPCONFIG
Return syntax:
ETHERNET MAC : <mac_address>
Address Type : <type>
IP : <host_ip>
SN : <netmask>
GW : <gateway_ip>
Telnet COM 1 PORT : 7501
Where:
-
<mac_address> = MAC Address
The MAC address in hyphenated hexadecimal format, e.g. 40-d8-55-1a-53-72
-
<type> = DHCP or Static IP
The addressing mode of the Network interface
-
<host_ip> = IP Address
The host IP address in dotted octet format, .e.g. 192.168.2.1
-
<netmask>
The netmask in dotted octet format, .e.g. 255.255.255.0
-
<gateway_ip> = IP Address
The gateway IP address in dotted octet format, .e.g. 192.168.2.254
Return example:
ETHERNET MAC : 40-d8-55-1a-53-72
Address Type : Static IP
IP : 192.168.2.1
SN : 255.255.255.0
GW : 192.168.2.254
Telnet COM 1 PORT : 7501
$TELNET_TIMEOUT - Set the TCP socket server connection timeout mode
Use this command to set a 2 minute timeout for all TCP client connections. For each client, if the client application sends no data for 2 minutes the Centro CM will disconnect the TCP socket.
Command syntax:
$TELNET_TIMEOUT <en_timeout>
Where:
-
<en_timeout> = ON or OFF
ON = Enable the timeout mode
OFF = Disable the timeout mode
Command example:
$TELNET_TIMEOUT ON
Return syntax:
SET TELNET TIMEOUT <en_timeout>
Return example:
SET TELNET TIMEOUT ON
$FACTORY - Reset the Centro CM to factory default values
Use this command to return the Centro CM to factory default settings.
If you are not careful, this is an easy way to lose communication with the Centro CM product. If you encounter a problem after using this command, see Troubleshooting
Command syntax:
$FACTORY
Command example:
$FACTORY
There is no return using this command. All TCP clients will be disconnected within 20 seconds. Note, you will need to establish a new TCP socket connection.
$REBOOT - Reboot the Centro CM
Use this command to reboot the Centro CM and release all TCP socket connections.
Command syntax:
$REBOOT
Command example:
$REBOOT
There is no return using this command. All TCP clients will be disconnected within 20 seconds. Note, you will need to establish a new TCP socket connection.
Command Errors
If the Centro CM encounters command data that contains an error, the returned data depends on the error:
Incorrect command keyword
Wrong Command!!
Incorrect command parameters
Command failed
Update Firmware
Updating Centro CM firmware will also restore the product to its factory default settings. Only update firmware if instructed to by DemoPad Support.
To update the firmware on the Centro CM, please download the latest firmware ZIP file from this link: Latest Firmware: Centro CM
To update the Centro CM firmware
- Format a USB Flash storage device to FAT32.
- Copy the firmware file to the root directory of the USB Flash drive.
-
Using the Centro CM Communication Protocol, send the command:
$UPDATE USB
- Immediately after, insert the USB Flash drive into the USB port on the Centro CM.
- The update should only take a few seconds. During this time there is no LED light activity on the product.
- If done correctly the unit's power light will stay red for 5-10 seconds and then flash green which means the update was successful.
- Turn off the power to the Centro CM and remove the USB Flash drive before turning the Centro CM on again.
Troubleshooting
I do not know the IP address of the Centro CM or I cannot connect to the Centro CM
- Power off the Centro CM. Wait a few seconds. Turn on the power to the Centro CM.
- Observe the DHCP address allocation for the Centro CM on your DHCP server.
If you cannot see a DHCP-allocated address for the Centro CM or suspect that the Centro CM has been set to use a static IP address, you can force the Centro CM to enable the DHCP client by restoring factory default values.
To achieve a Factory Reset state, use a blunt object to depress the internal push-button as indicated in the picture:
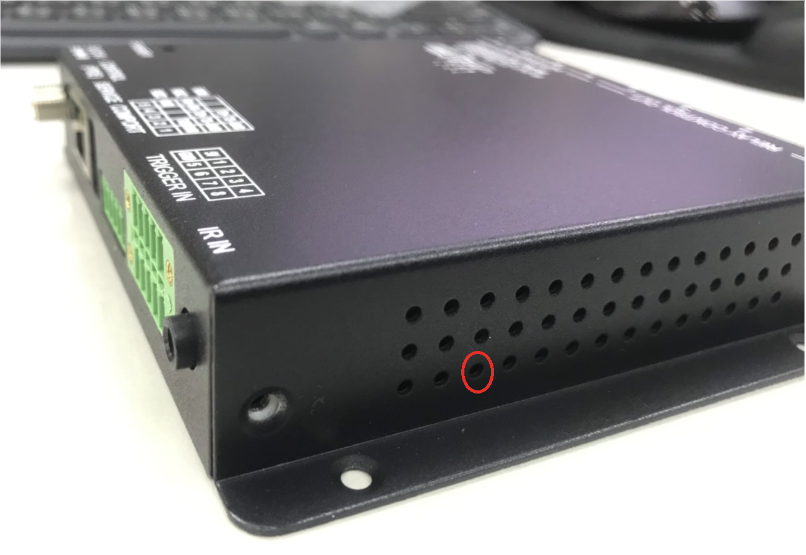
- Once you press and hold the button, the LED inside will turn red.
- Keep holding the button for 10 seconds.
- After 10 seconds, release the button.
- The Centro CM will perform a factory reset and reboot.
Some data sent / received from a RS-232 / RS-422 / RS-485 port is incomplete or incorrect
- Check that you are using a raw TCP socket client application. Using Telnet or another application layer to abstract or wrap data through additional protocols or standards will likely result in some data not being represented correctly.
- Check the UART parameters set for the RS-232 / RS-422 / RS-485 port are correct relative to the 3rd-party equipment connected by serial. This includes the line signalling mode, the baud rate, number of bits used in the data byte, the use of a parity bit and the number of stop bits.